How to Prepare Raised Garden Beds for Spring (Organic Soil Method That Improves Every Year)
Prepare your raised garden beds for spring with this simple, organic method that improves soil health year after year. Learn how to use compost, worm castings, minerals, and slow-release fertilizers to build rich, productive soil naturally.
GARDENING TIPSRAISED BED GARDENINGSOIL HEALTH
3/18/20263 min read

Getting your raised beds ready for spring doesn’t need to be complicated — but it does need to be intentional.
Over time, I’ve developed a simple routine that keeps my soil healthy, productive, and easy to work with year after year. Instead of replacing soil or starting over each season, I focus on revitalizing what’s already there.
This approach is rooted in soil science: feeding microbial life, improving structure, and building long-term fertility.
Here’s exactly how I prepare my raised garden beds for spring planting
Step 1:
Add Worm Castings (Microbial Boost)
The first thing I add each spring is worm castings.
Worm castings (vermicompost) are one of the most powerful organic soil amendments because they:
Contain beneficial microbes and fungi
Release nutrients slowly over time
Improve soil structure and water retention
Help reduce transplant shock
Scientifically, worm castings improve soil biology by introducing microbes that help convert organic matter into plant-available nutrients.
They also act as a slow-release fertilizer, meaning your plants get steady nutrition without the risk of burning.
How I Use Them:
I lightly top-dress my beds and gently work them into the top layer.
Step 2:
Add Trace Minerals (Azomite)
Next, I add Azomite, which is a natural mineral amendment.
While compost and organic matter provide nutrients, they don’t always supply trace minerals — and those are essential for plant health.
Azomite helps:
Replenish depleted soil minerals
Support enzyme activity in plants
Improve overall plant resilience
These micronutrients play a key role in plant metabolism and long-term soil fertility.
Step 3:
Apply a Slow-Release Organic Fertilizer
After minerals, I add a balanced slow-release fertilizer from Plant-Tone.
This provides:
Nitrogen (leaf growth)
Phosphorus (root development)
Potassium (overall plant health)
The key here is slow-release.
Unlike synthetic fertilizers that dump nutrients quickly (and can harm soil biology), organic fertilizers feed plants gradually and support microbial life.
Step 4:
Lightly Work the Top Layer (No Heavy Tilling)
This is an important step — and one I used to overdo.
Instead of deep tilling, I now:
Lightly loosen the top few inches
Smooth the surface
Mix in amendments gently
Why?
Because aggressive tilling can:
Disrupt soil structure
Damage fungal networks
Reduce microbial life
Soil science supports minimal disturbance to preserve beneficial biology. Think of this step as “blending,” not “turning.”
Step 5:
Add Compost (The Foundation of Soil Health)
If there’s one thing you shouldn’t skip, it’s compost.
Compost is often called the “gold standard” of soil amendments because it:
Adds organic matter
Feeds microbes
Improves water retention
Enhances nutrient cycling
Healthy soil = biologically active soil. And compost is what feeds that system!
Step 6:
Add a Thin Layer of Fresh Topsoil
Finally, I add a thin layer of topsoil or raised bed mix.
This helps:
Create a clean planting surface
Improve seed-to-soil contact
Support early root development
It’s not about replacing your soil — just refreshing the top layer where your seedlings will start.
Optional Upgrade (Highly Recommended)
If you want to take this a step further, consider adding:
Coco coir → improves moisture retention
Mulch (after planting) → protects soil and prevents drying
Cover crops (off-season) → builds long-term fertility
These additions help your soil stay balanced throughout the growing season.
Why This Routine Works (The Science)
This method works because it supports the three pillars of healthy soil:
1. Biology
Worm castings and compost introduce beneficial microbes that break down nutrients and support plant health.
2. Structure
Organic matter improves soil aggregation, aeration, and water retention.
3. Nutrient Cycling
Slow-release fertilizers and organic inputs provide steady nutrition over time — not quick spikes.
Organic amendments don’t just feed plants — they build a system that keeps feeding plants long-term.
What I’ve Noticed Over Time
Since following this routine:
My soil gets easier to work each year
Plants establish faster after transplanting
Water retention has improved
I need fewer inputs over time
With a little intention each spring, your soil becomes easier to work, more productive, and more resilient. It’s one of the most rewarding parts of gardening — watching your soil improve right alongside your plants.
Happy Gardening!
This post contains affiliate links, which means I receive a small commission if you make a purchase through them, at no extra cost to you.
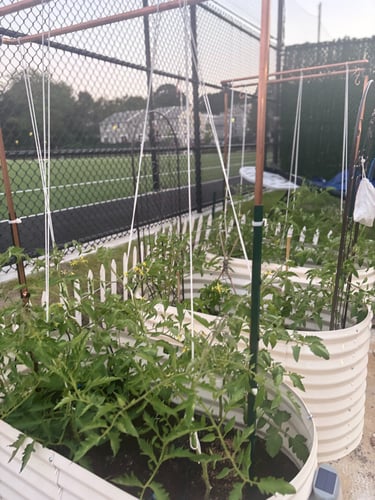
Above is a picture of some of my urban raised garden beds at the start of the growing season last year using the single stem string trellis method for my tomatoes.